The Whole Knit & Caboodle

Barely coherent ramblings of a yarn-obsessed stay at home mom

Crochet Necklace/Bracelet Tutorial

Hi everyone!  There was a great response to my post yesterday so I put together a tutorial so you can all make your own crocheted chain jewellery.

Please note that it might not be possible for you to get the exact chain that I used so you may need to improvise a little bit.  Consider this more of a guideline or “tips and tricks” for making a necklace.

I got my chain at Walmart but some bead stores have spools of it and you can buy as much or as little as you’d like.  I used a curb chain for this project, if you look in the first photo, you’ll see that the links are shaped in such a way that the chain lays flat and it makes it easy to crochet around the outside edge.

Here are the materials I used:

Red Heart Luster Sheen yarn (Fine- #2.  The colour shown is “Vanilla” and the necklace I posted yesterday was done in “Violet”)

Two pairs of pliers to open jump rings/shorten your chain if needed.  It doesn’t REALLY matter what kind of pliers, I just used whatever I had.

Chain.  These chains came pre-cut in 20″ lengths.  You can shorten your chain to make a shorter chain or a bracelet (like I’ve done in this tutorial).

Crochet hook- I used a D/3.25mm hook, it’s just a touch smaller than the one recommended for the yarn I used.

010

You’ll also need a clasp of some sort.  Personally, I prefer toggles (left), they’re easier to use, especially if you’re making a bracelet.   I also used the jump rings pictured as well as one more that isn’t pictured.  Also not pictured: yarn needle and scissors.

019

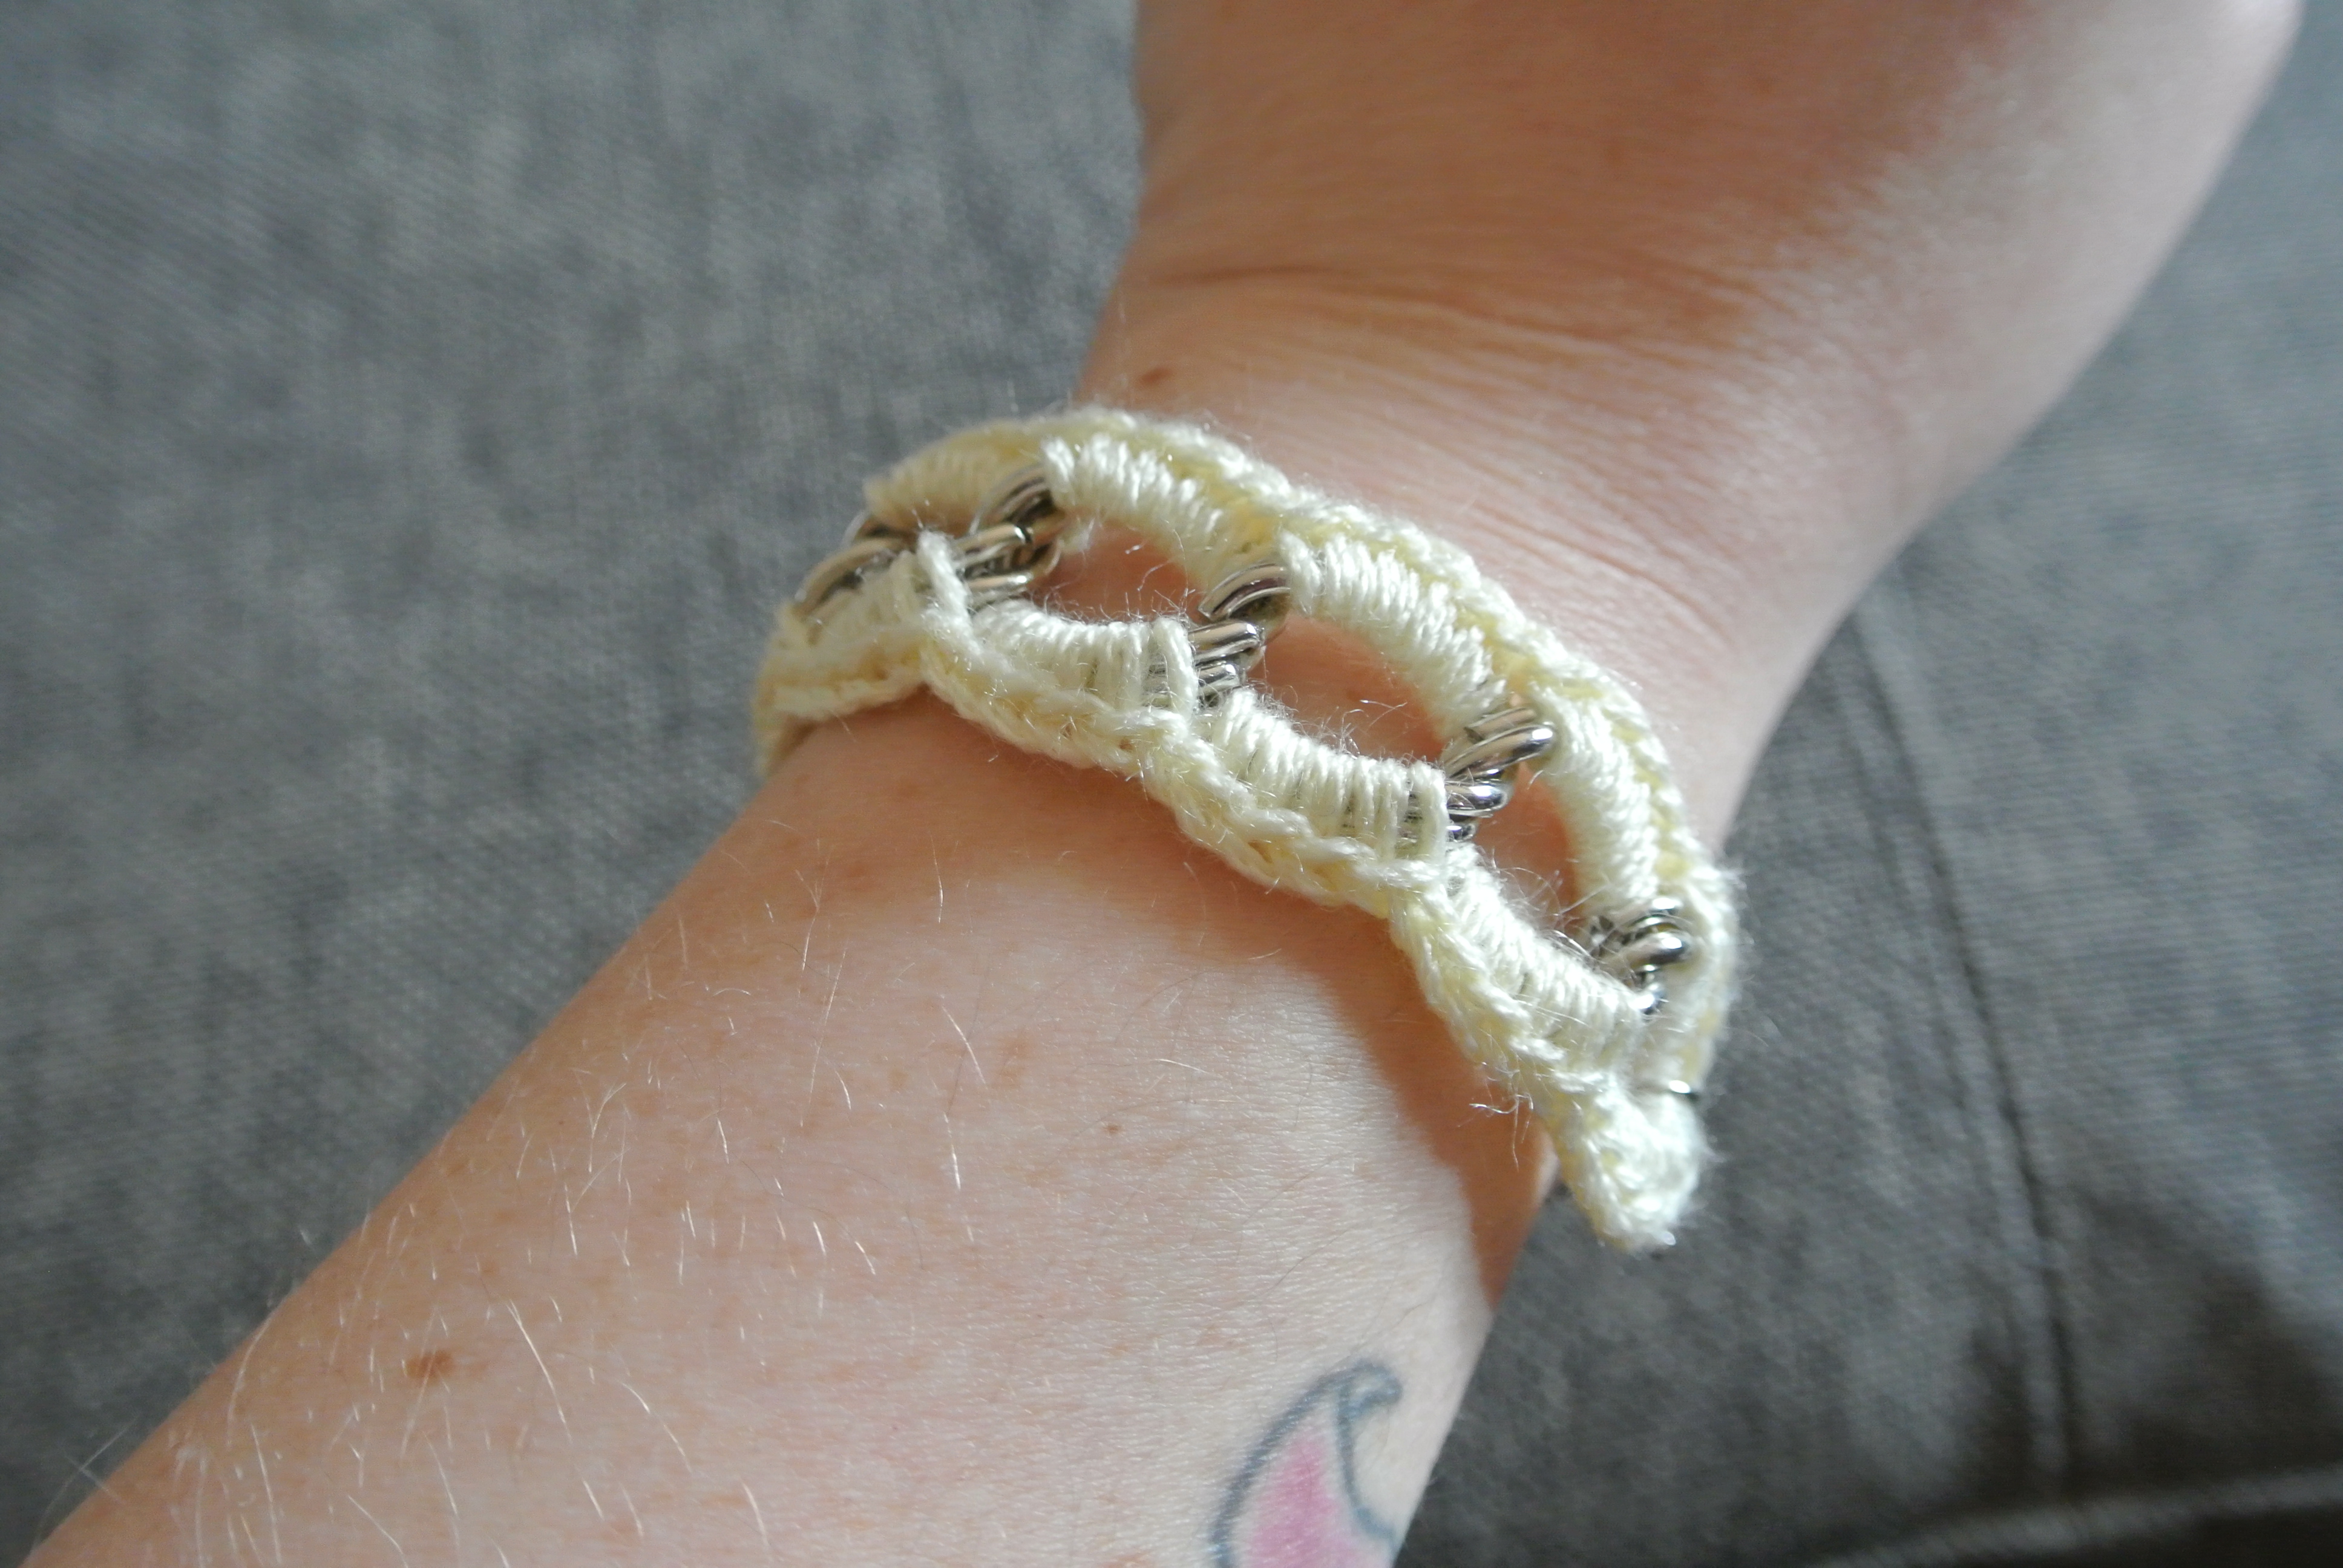
I decided to make myself a bracelet this time around.  If you want your necklace/bracelet to be a certain length, make sure you take into account the fact that you’re going to put a clasp on it and make the chain a little bit shorter.  Otherwise, you’ll end up with a finished piece that is a little bit longer than you expected.  For this bracelet, I started with a chain that was about 6″.

012

To shorten your chain, take a look at the links.  They should be open (meaning there should be a cut in one end of each link).  Take your pliers and clamp one pair of pliers on each side of the link, just beside the cut in the link.  Push one side of the link away from you, and pull one side toward you, so that you’re twisting the link open.  If you simply pull the link open, you’ll weaken the link.  Not such a big deal if you don’t plan to use the link again but you’ll want to open your jump rings the same way.  When they’re open, they’ll look like this:

018

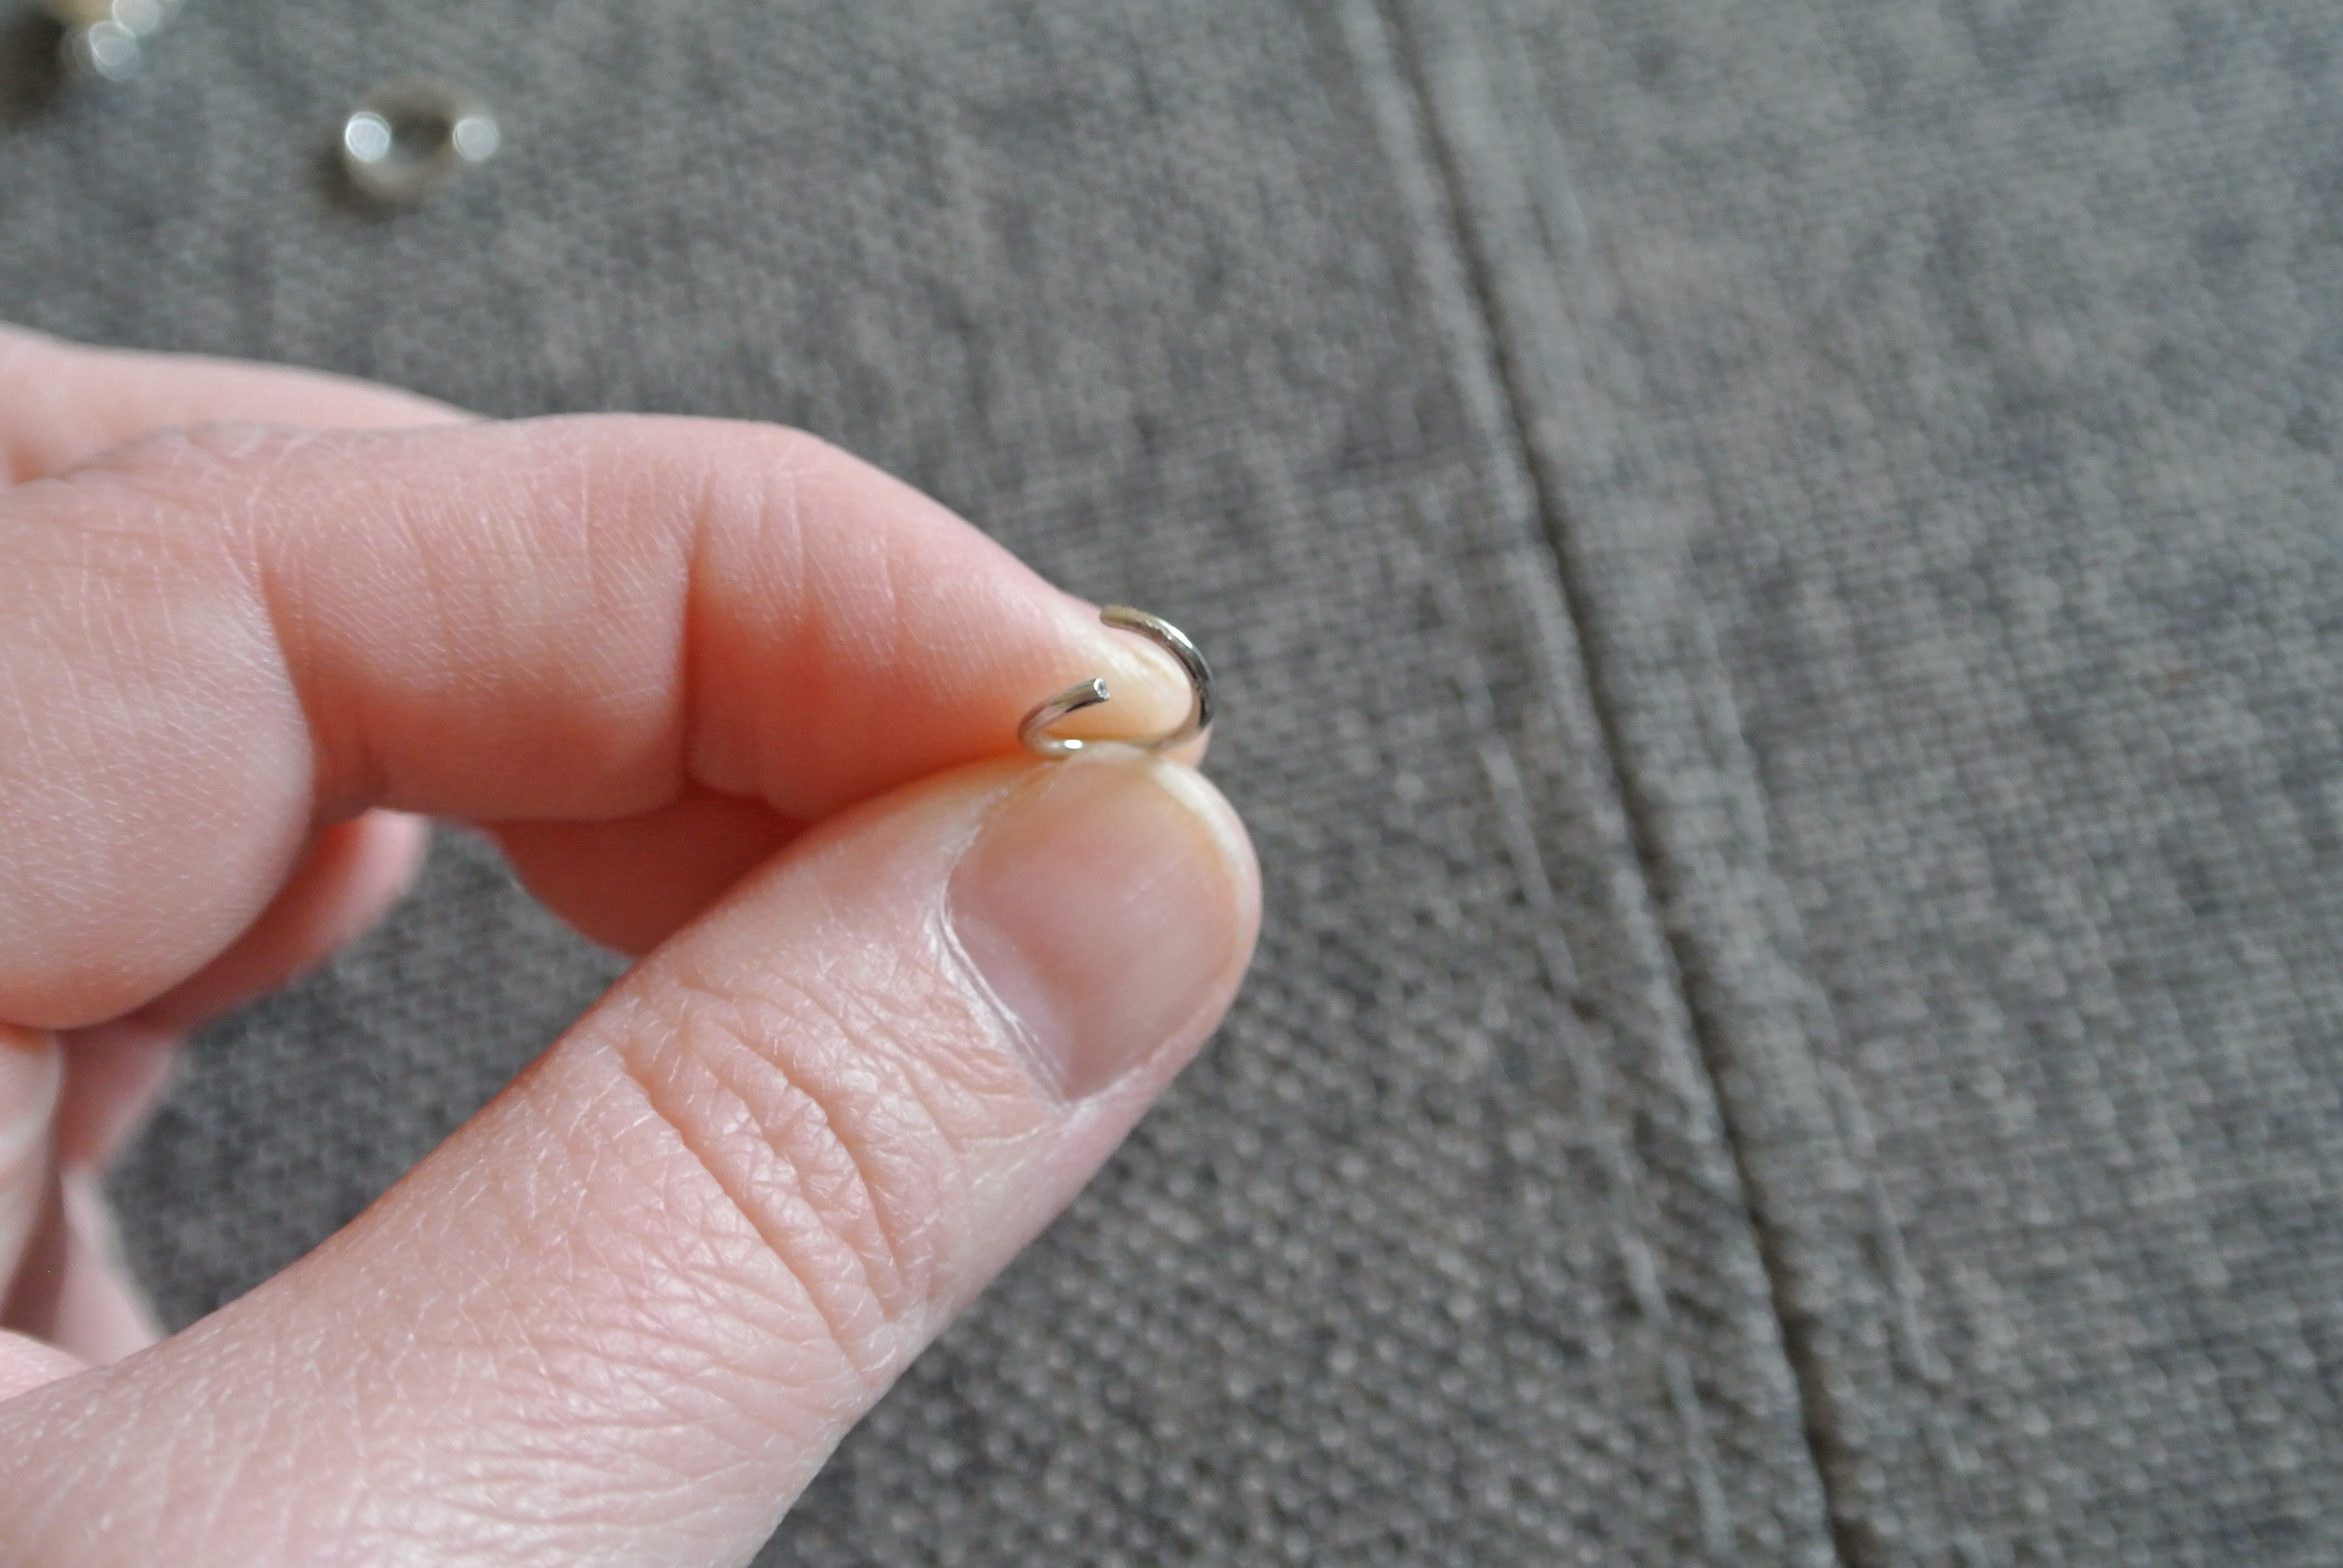
(You’ll close the links and the jump rings by holding them the same way you did when you opened then, only you’re twisting the ends back together)

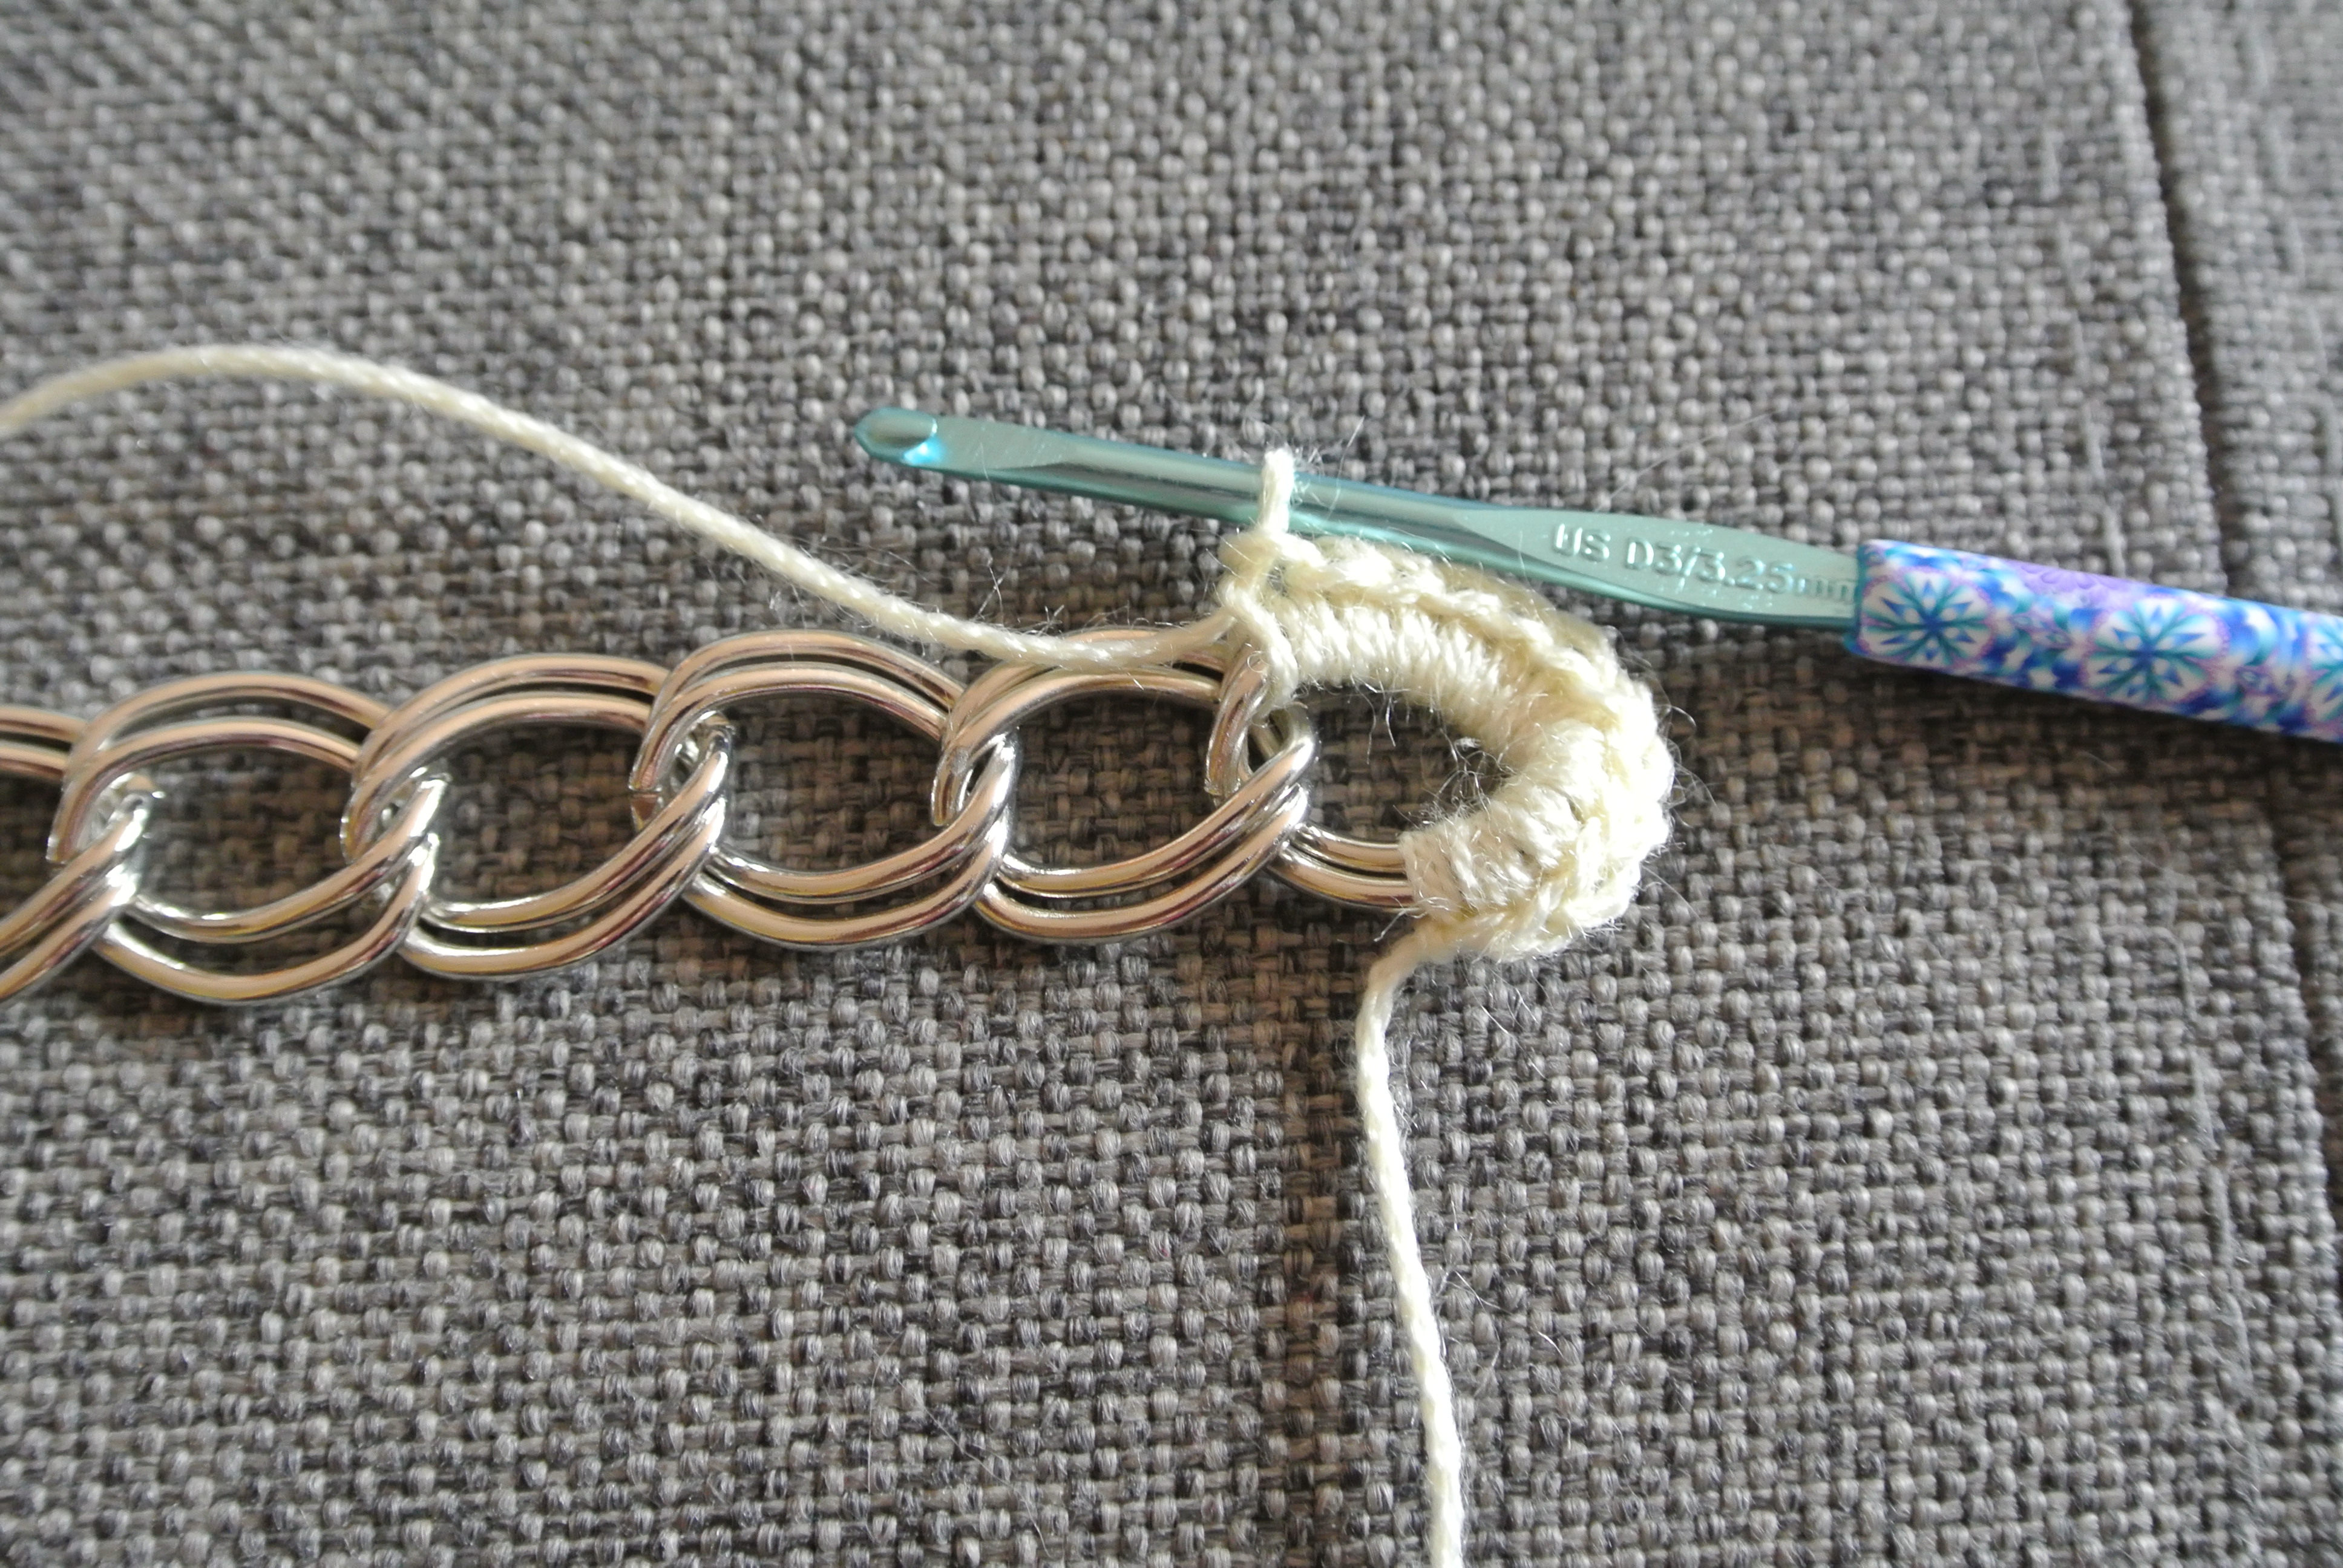
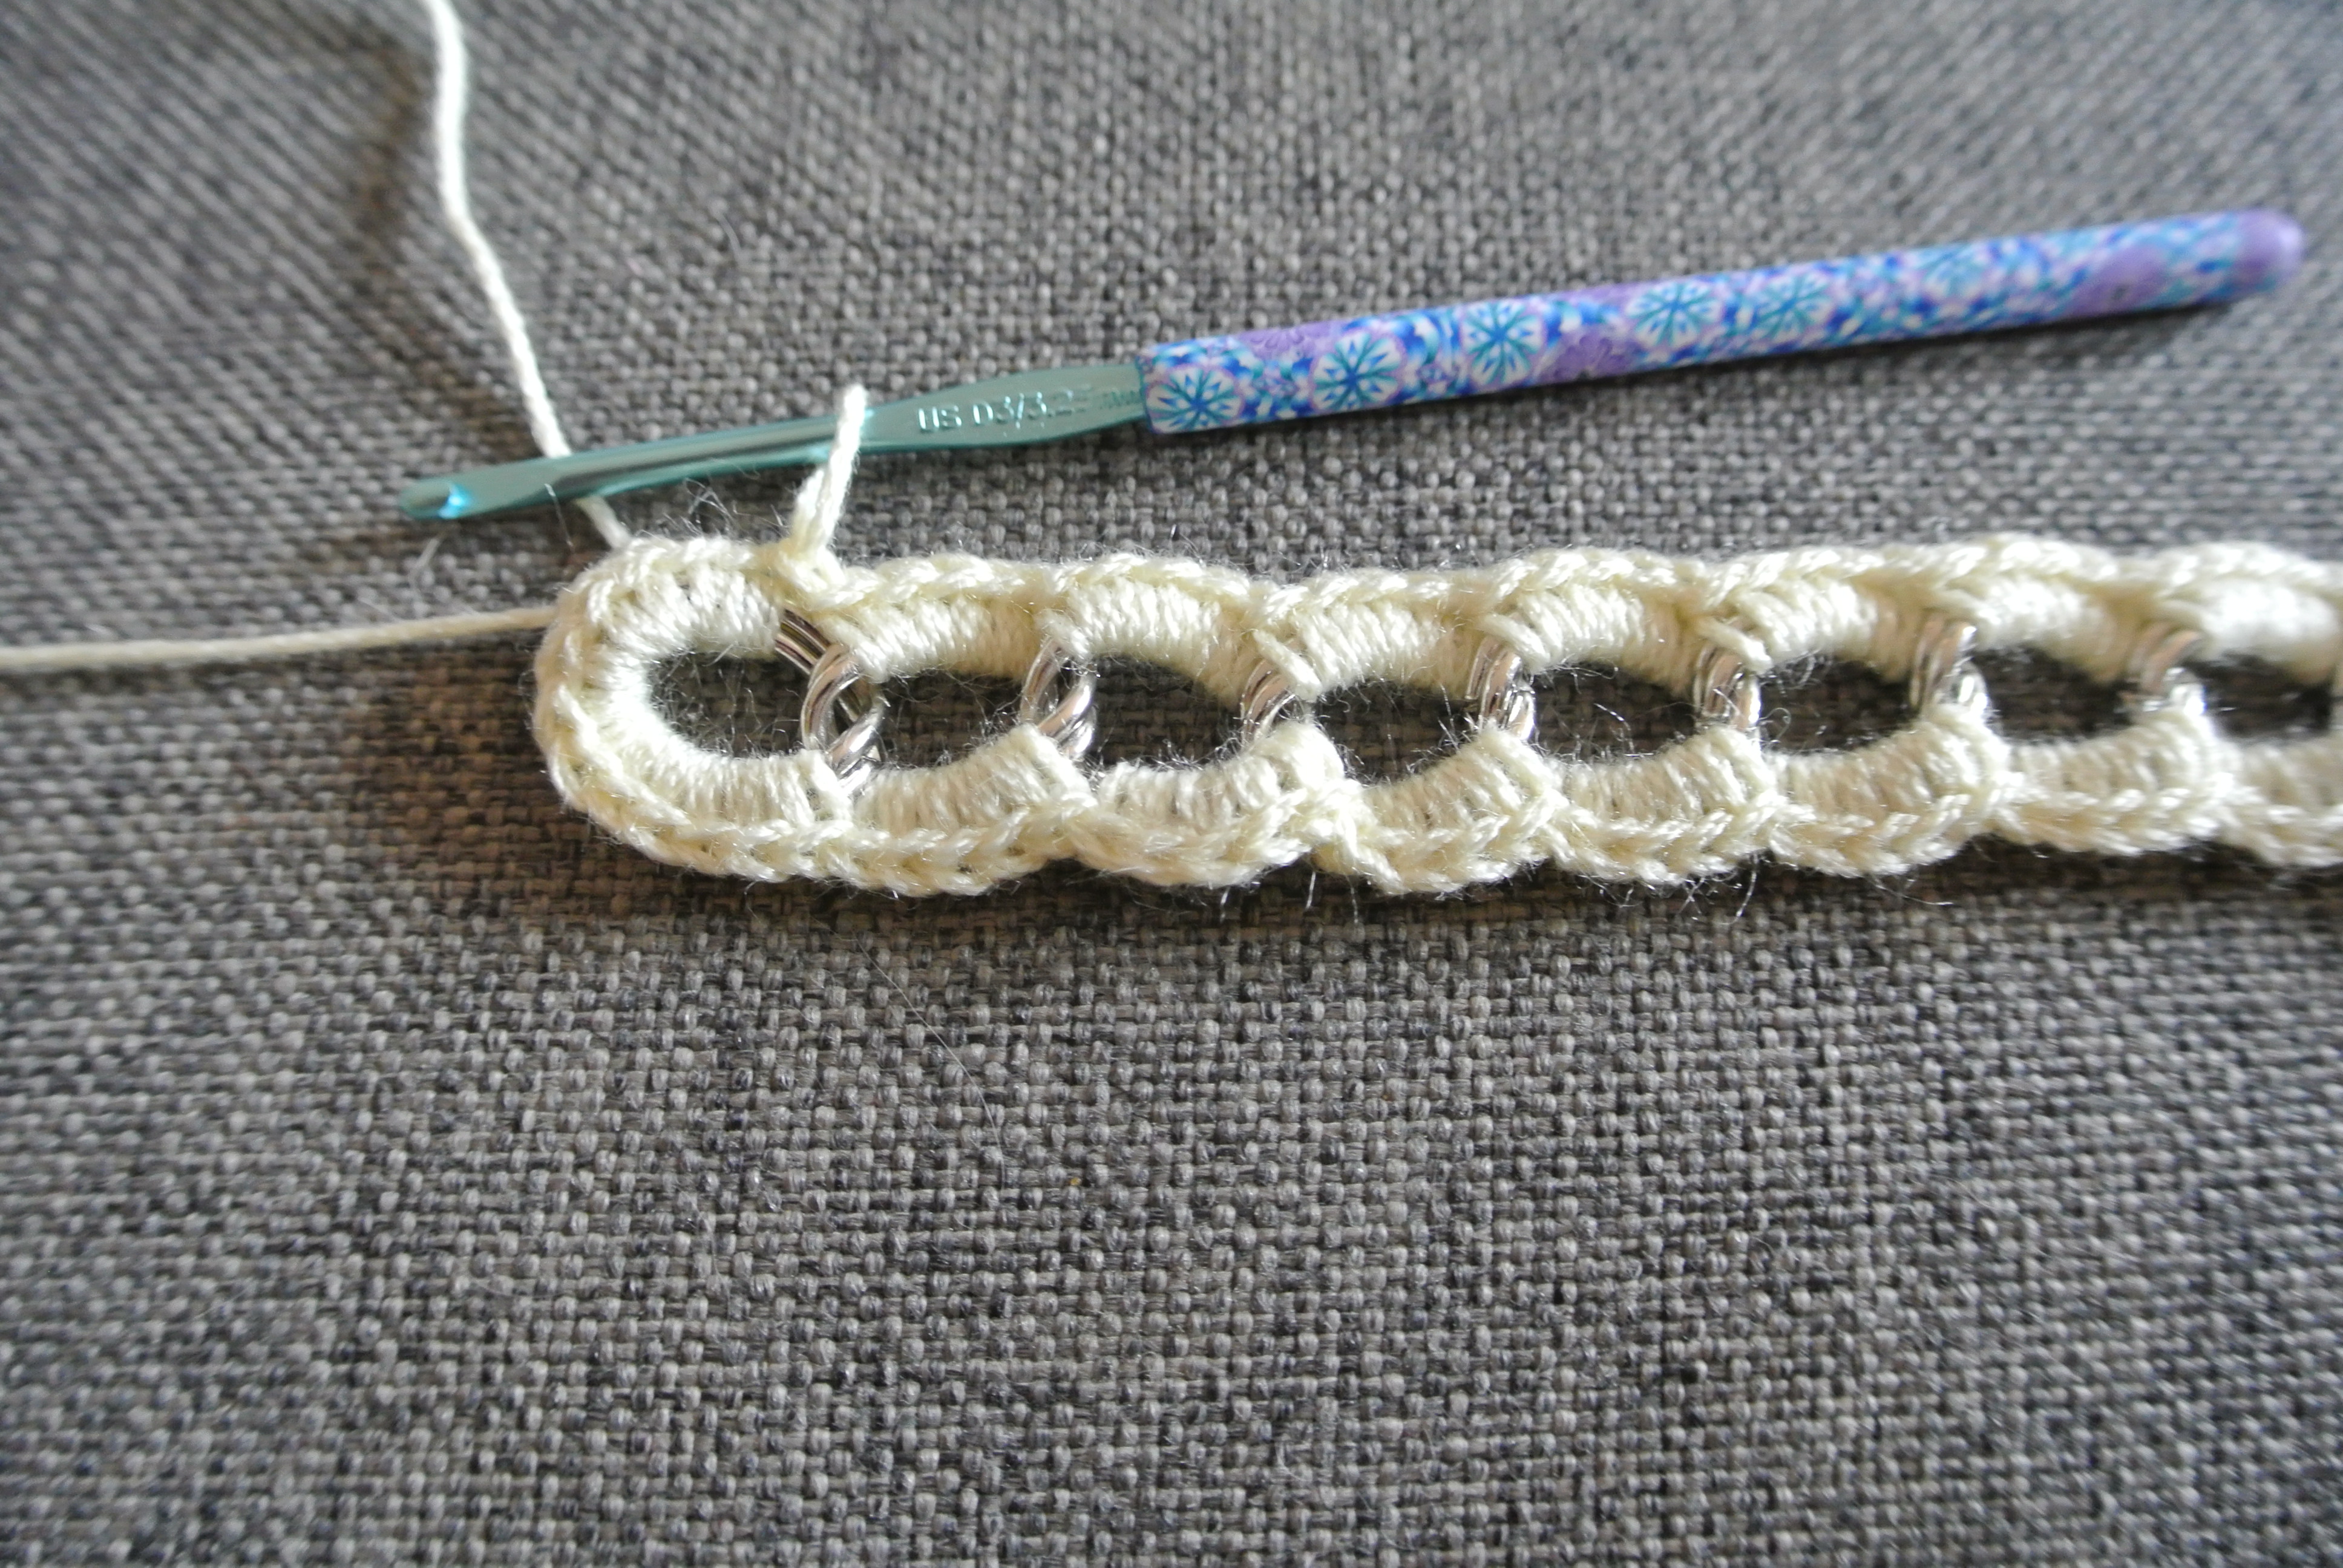
Once your chain is the length you want it, you can start to crochet!  Put a slip knot on your hook.  You’ll join with a single crochet in the link at the end.

013

Here’s where the “guideline” thing I mentioned before comes in.  The number of sc stitches you work in each link will depend on the size of the links and the weight of the yarn you’re using.  If you work too few or too many sc in each link, it won’t lay properly.  Experiment a little bit.  I worked 14 sc in the first link.

014

Continue into the second link.  I worked 5 sc into each link along the side.  It might feel a little awkward to hold on to the chain but you’ll get used to it.  It helped me to hold on to the link I was working in instead of trying to hold on to the whole chain.

015

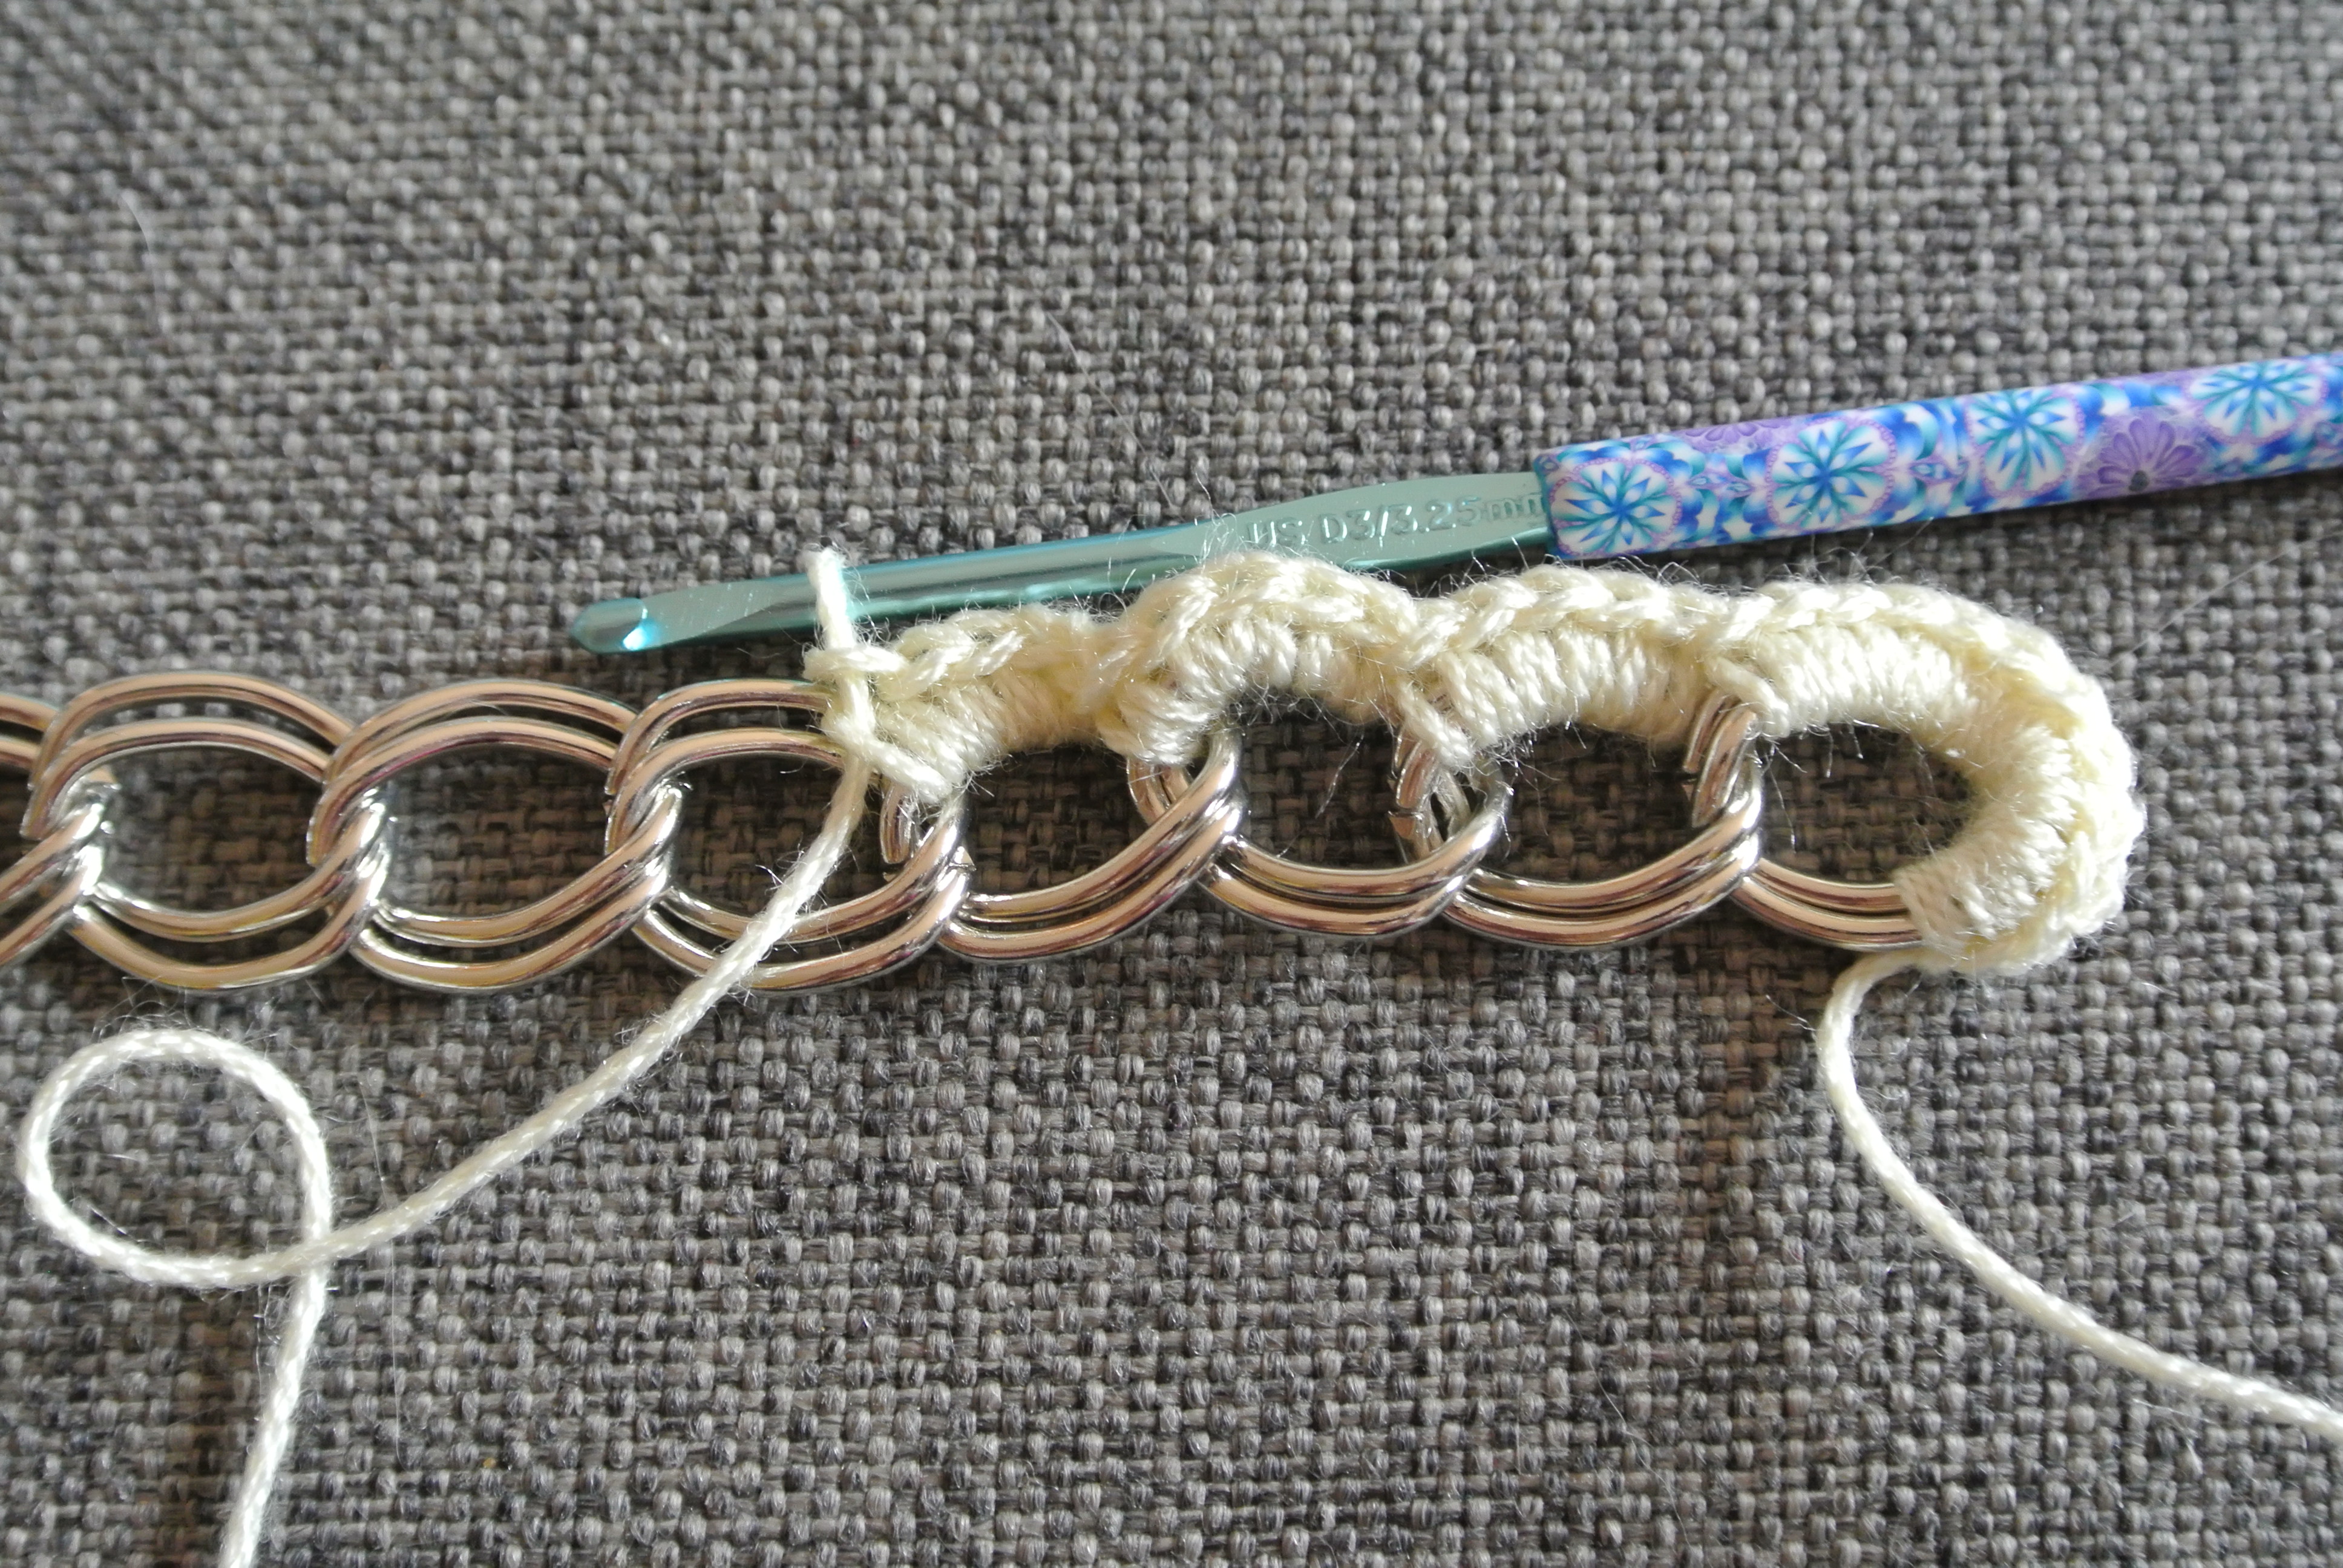
When you reach the link at the end, work the same number of sc as you did in the first link and continue crocheting along the other side.

016

When you reach the point at which you started, slip stitch into the first st made.

017

Weave in the ends.  When I attached the clasp, I put the jump rings through the chain instead of just through the crochet stitches.  This makes it more sturdy.  If you used a lobster clasp, you can add an extender chain if you’d like.  This makes it nice if you’re giving the bracelet as a gift and you don’t know what size wrist your gift recipient has.

020

When I finished making the bracelet, I decided to work another round and jazz it up a little:

022

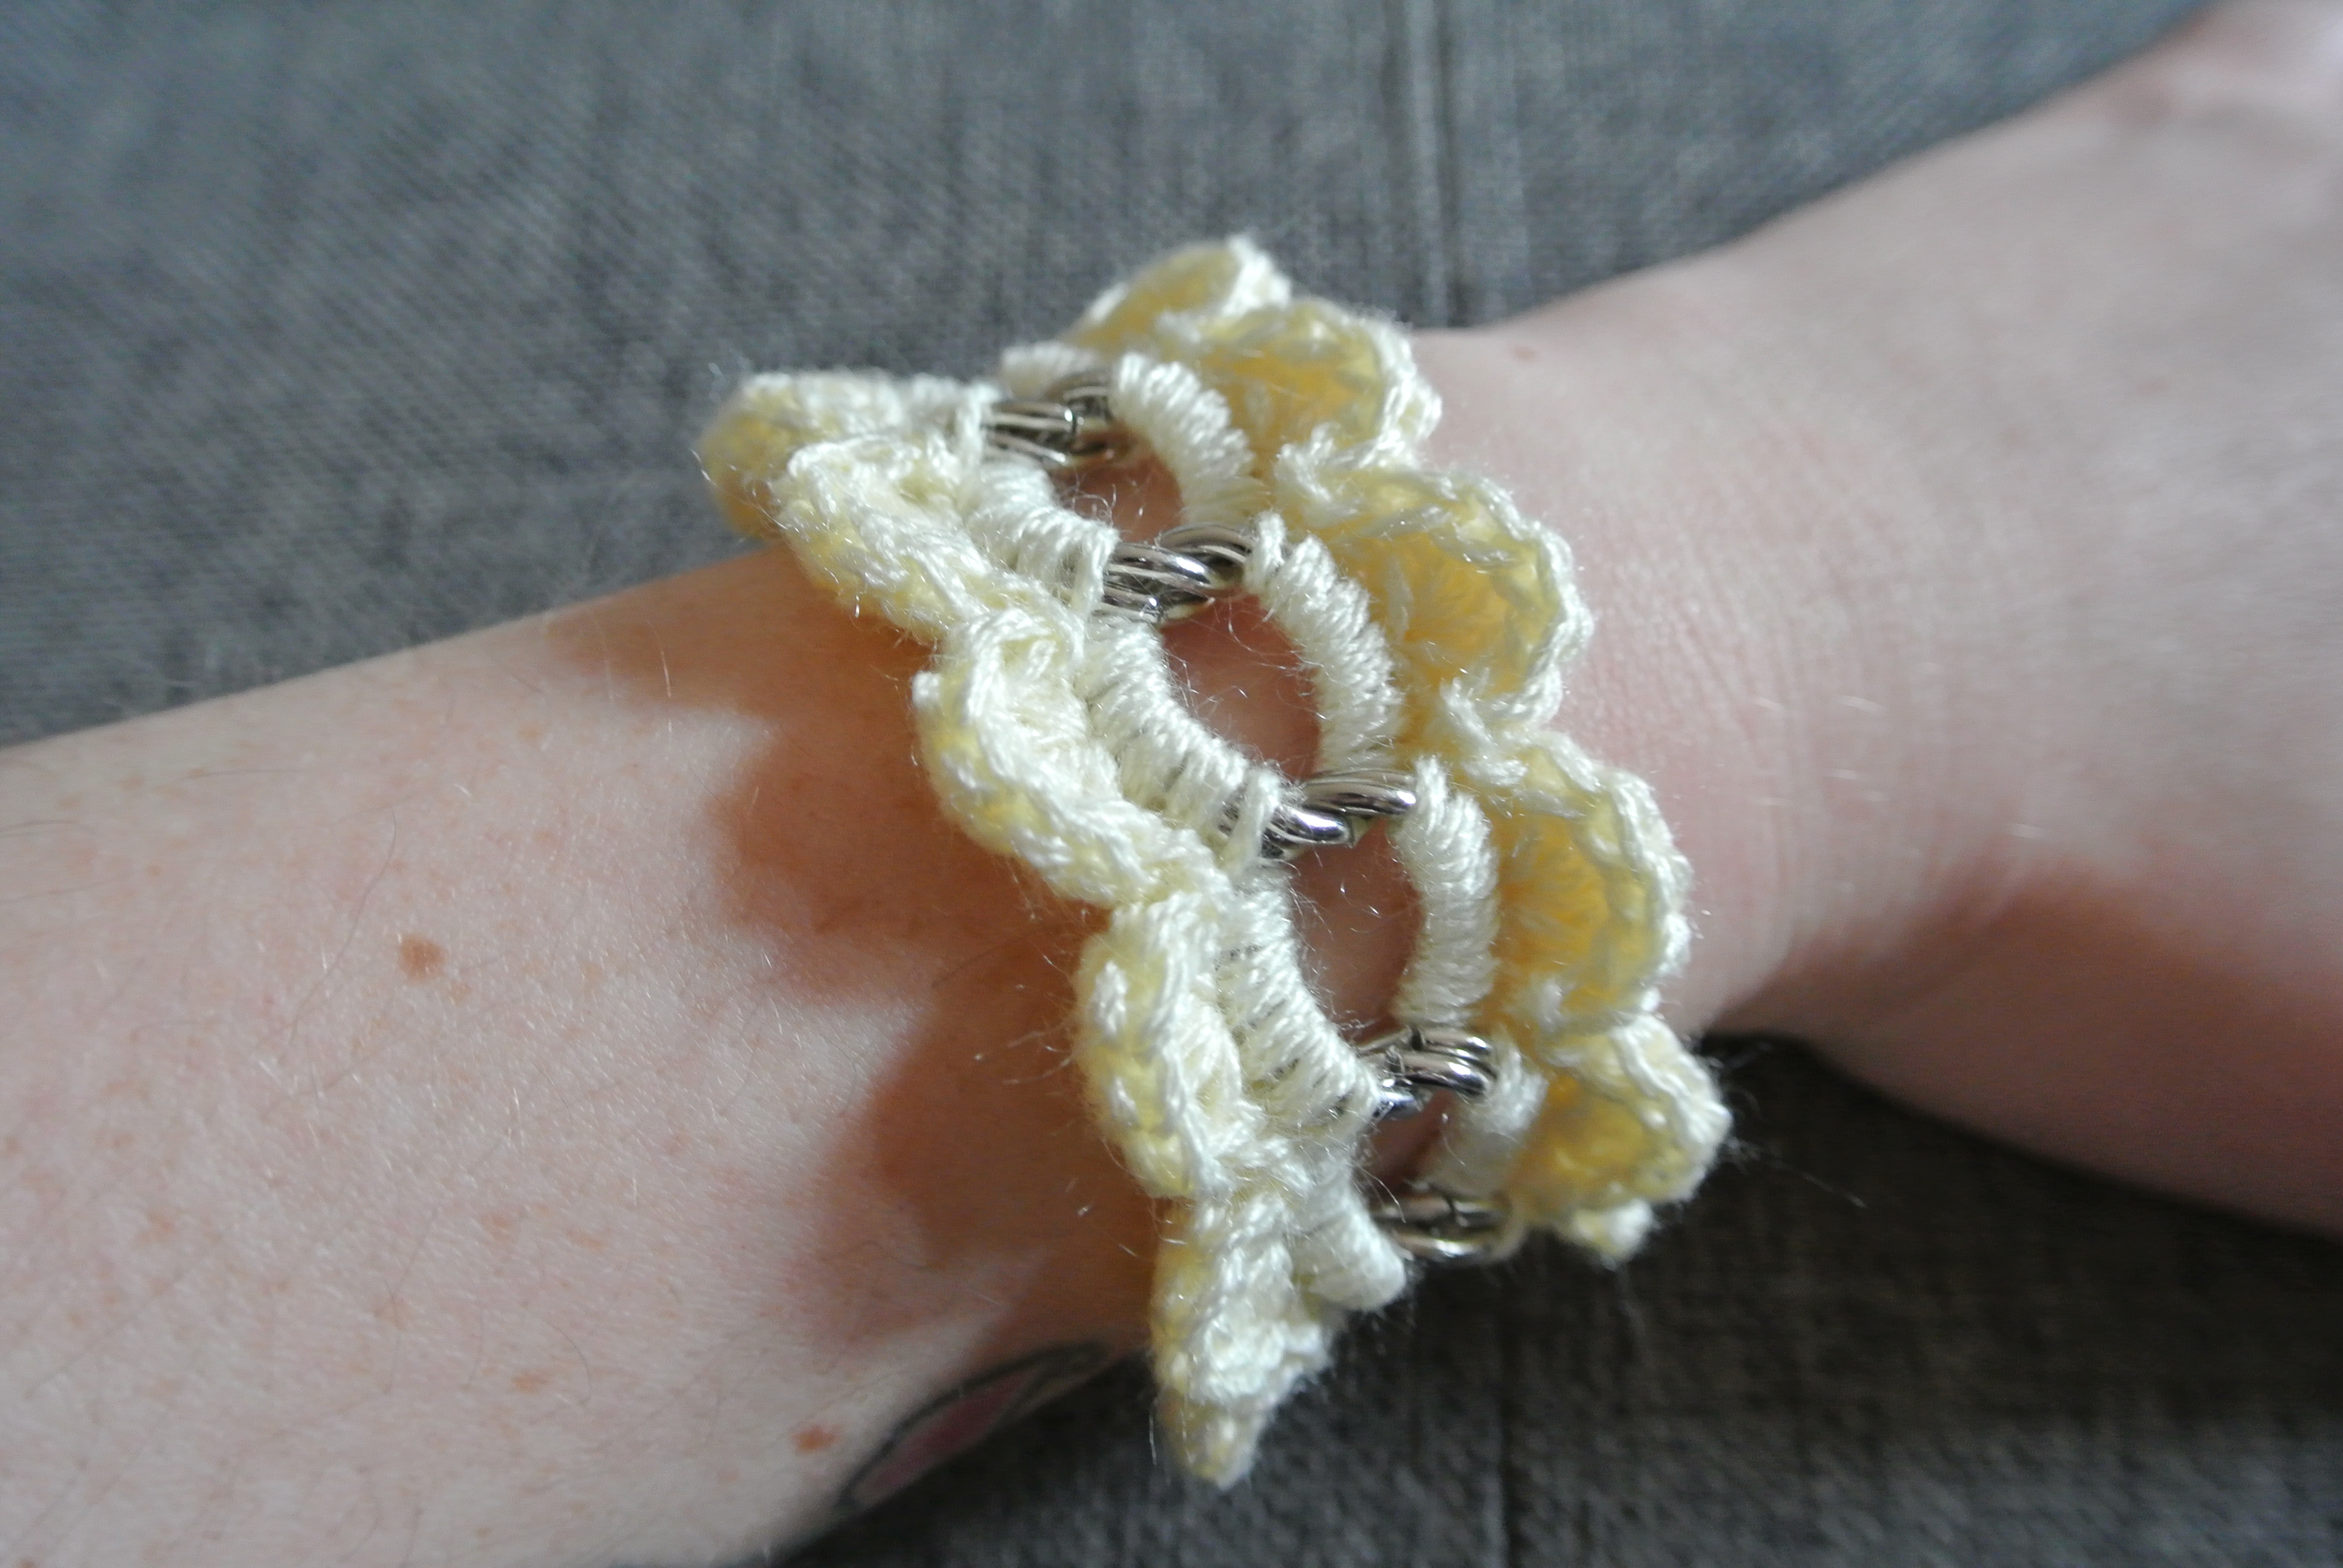
Because there were 5 stitches in each link, I worked a 7-DC shell into the middle stitch in each link.  Get creative, what designs can you come up with?

025

I also got fancy and added a crystal and a little bird charm to the end. 🙂

That’s it!  These work up really quickly and look beautiful.  Keep a few on hand for quick gifts!

Sarah 🙂

Advertisement
10 Comments »

Cute Crocheted Necklace

Apparently Mother Nature didn’t get the memo that it’s Spring, because it’s snowing here in British Columbia.  Yes, I’m terribly sorry to be using a 4-letter word here on my blog (especially such an offensive one, given the fact that it’s March), but if I have to deal with it, I’m not going to do it quietly!

Yesterday it was pretty nice outside.  I bought some really cute clothes for my daughter (and shoes that make her “FAB-u-wous”, as she said) and while I was picking up some supplies I came across some chain I thought would make the foundation of a really cute necklace.  I couldn’t wait to get it home to work on it!  It worked up REALLY quickly and looks awesome!  SO awesome in fact, that I think I’m going to brave the weather today to run out to get some more chain.  What do you think?

Image

Image

A great, inexpensive way to add a pop of colour to your wardrobe!  Is there any interest in a tutorial?  I might be persuaded to post one!

Happy Spring everyone!  I hope the weather is kinder where you are 😉

Sarah

18 Comments »

Design Wars 6 Final Reveal!

Is it just me or has this round of Design Wars gone by in a flash?  It’s probably because I was a challenger, but wow!

Yesterday all of the final designs were revealed and though I had seen most of them before the reveal, but it really hit me that the breadth of talent in this round is really amazing!  There really is something for everyone in this round.

My daughter was the inspiration for my design; I have a really cute photo of her from a couple of Christmases ago, dressed up like she was making cookies.  I swapped the cookies out for cupcakes but the rest of the design is pretty close.  Here are the shots I took for the reveal:


Cupcake, anyone?

Cupcake, anyone?


Patty Cake, the Baker Girl

Patty Cake, the Baker Girl


Now that the designs have been revealed, voting is open!  Head on over to the Design Wars Blog to see the rest of the amazing designs and vote for your favourites in a number of categories.  While you’re there, make sure you enter to win a fabulous prize pack from Red Heart Yarns!  You can vote every day, so make sure you stop back again and again!

If you’re interested in any of the patterns from this round, they will all go on sale on Ravelry starting March 12th.  Check out the newlsetter for coupon codes!

I would really like to thank Red Heart Yarns for sponsoring this round.  With Love is a wonderfully soft yarn to work with;  I’ll buy it again for sure!  Big thanks to Salena Baca from Baca Creations for hosting another amazing round and thank-you to all of the amazing challengers I shared this round with.  Even though we were up against each other, the respect and support everyone had for everyone else was really amazing.  Maybe you’d like to stop by their fan pages say hello and congratulate them on an amazing round!

Sincerely Pam

Crazysocks Designs

A Crocheted Simplicity

Rohn Strong 

Luz Patterns

One and Two Company

Abigailology

Frayed Knot


4 Comments »

The YARN Has Landed!

Who’s excited about Design Wars 6?  THIS lady, right here!  Want to know what makes it even more exciting?  I got my DW yarn today!!

I’m no stranger to Red Heart With Love.  It’s a soft, durable acrylic yarn and it’s available in lots and lots of  rich colours.  The skeins are generous in size (7 ounces 370 yds/338 m) and am I weird when I say that the black labels with the gilded lettering make me feel extra fancy??

Bonus points to Red Heart because not only WEREN’T the centre pulls hidden in the abyss of each skein, they were waiting for me just outside the skein as if to say “We’re ready, let’s DO this!”

Here are some shots of the loveliness:

Yeah, I took it for a drive in my car.  Don't judge me.

Yeah, I took it for a drive in my car. Don’t judge me.


Love, Love, Love, Love, Love, Love, Love <3

LOVE x 7!


LOVE With Love!

LOVE “With Love”!


Be sure to sign up for the newsletter at http://www.designwarschallenge.com to stay up to date on all the goings-on!

Sarah 🙂

2 Comments »

Design Wars and FREE Pattern Release!

Hello friends!  I’m sorry it has been so long since my last post, things have been hectic around here because of the holidays (Christmas is my busiest time for orders and this year was no different) I’ve had little time for anything but crocheting and sleeping.  OK.  That’s a lie.  I got some very nice time in with my family- my daughter turned 3 at the end of November so I can easily say that this was the most magical Christmas of my adult life so far.

I received some amazing news around the same time- The application I submitted to be a challenger in the Design Wars Challenge was accepted!  I’m SO excited!  I’ll be going head to head with some of my crochet idols in this challenge, I hope I can keep up!  For those of you who aren’t familiar with the challenge, it was founded by Salena Baca of Baca Creations and is sponsored by Red Heart Yarns.  A yarn is chosen for the challengers to work with and they each come up with a new, original design.  Once the designs are completed and revealed, the public gets to vote on their favourites in a number of different categories.  There is a lot of fun to be had and there are even prizes to be won!  There is SO much amazing talent in this round, I hope you’ll check it all out!  For more information about this elite crochet challenge, please visit http://www.designwarschallenge.com.

While I’m waiting for my Design Wars yarn to arrive, I decided to get the ol’ pattern-writer primed up.  What I came up with is possibly the fastest, easiest, one skein cowl you’ll ever make.  I made mine with a skein of Loops & Threads Charisma and it took me less than an hour.  Available for FREE on Craftsy and Ravelry for, I hope you’ll rush over and download a copy!  If you make one up, let me know what you think!

Thank-you to my beautiful friend Jenelle for modelling! :)

Thank-you to my beautiful friend Jenelle for modelling! 🙂


7 Comments »